
As we approach the festive season, we want to express our gratitude to our wonderful customers for their support throughout...
Read More
 FREE UK carriage on orders over £250 nett
  No minimum order value
  Trade discounts
  Order FREE samples online
  Last cut off for overnight: 3pm

How to Choose the Right Packer: A Guide for Builders & Installers
By Bridey
/ May 30, 2025
When it comes to getting clean, level, and long-lasting results in construction, the details matter. But with different thicknesses, sizes,...
Read More


Furniture handles and drawer pulls can be the perfect finishing touch to any kitchen design or cabinet fitting so its important to make sure you pick the correct handles for your application. This handy guide will explain how to determine which furniture handles you need, and how to install them.
Which type of handle do you need?
Furniture handles and drawer pulls are available in a wide choice of shapes, sizes and styles so we will break down the options so you know whats best for your furniture / installation.
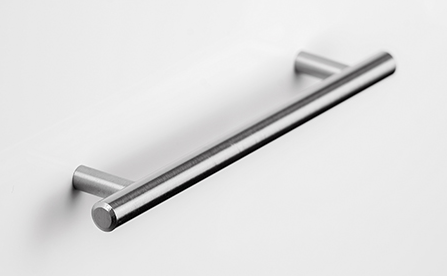
Dual Fix Bow Handles & Bar Handles
These handles are surface mounted and use 2 holes to fix to the door / drawer / cabinet. Dual fix handles are generally available in Bar and Bow shapes, in a choice of metal or plastic. The critical factor to determine with these handles, especially when being used to replace existing ones is the hole spacing measurement. ‘Hole Spacing’ refers to the distance between the 2 holes; generally there are a number of industry standard* spacing’s; 32mm, 64mm, 96mm, 117mm, 128mm, 132mm, 160mm, 192mm, 224mm, 256mm, 288mm and 320mm. Most existing handles should align with these sizes so finding a replacement will be straight forward. If installing a new handle, then its best to measure the space on the drawer / door and decide how big you want the handle to be, in conjunction with the standard sizes, and find a handle based on that size.
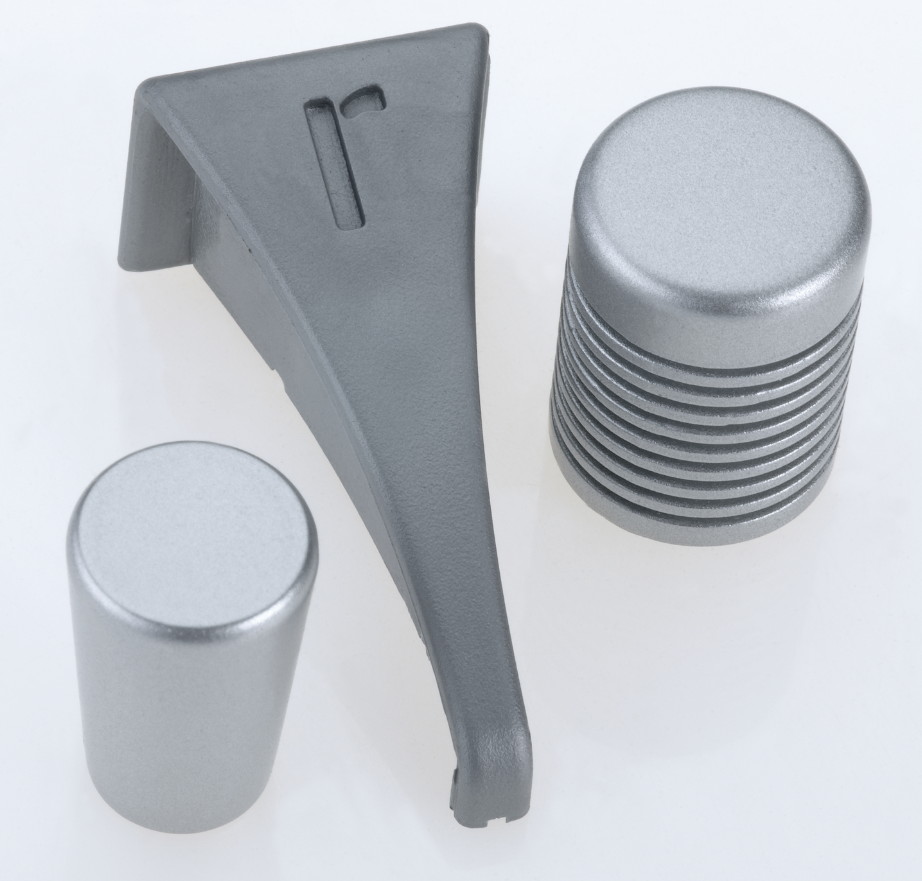
Single Hole Fix Knobs & Cabinet Pulls
The single hole fix knobs and cabinet pulls are as their name suggests and just use a single hole for fixation. This allow for flexibility in terms of not being restricted to a certain size however due to their design they are only suitable for certain applications.

Inset Handles
The inset handles and pulls are designed to fit flush in to doors, cabinets and drawers. They require a recessed hole / cut out to fit. Inset handles are generally sold by by the hole size they require.
How to fit drawer handles & cabinet pulls
How to fit dual fix handles

New Handles
Required: Pencil, Drill & Suitable Drill Bit
- Decide roughly the desired position of the handle, and then hold the new handle on the surface in place of the exact location, use a pencil to mark the entry points of where the screw holes will go. Measure the spacing between the entry points to make sure its correct and you are happy with the positioning.
- Using your drill and drill bit, drill through the entry points
- Hold the handle over the newly formed holes and push your screws through the holes – using your hands at first to tighten in place, and then use a screwdriver to tighten all the way and fix the handle on firmly.
Replacing Old / Existing Handles
- Measure the distance between the 2 existing screw holes – check this measurement is the same as the hole centres on the new handle
- Remove the old handle by unscrewing the bolts
- Hold the handle over the holes and push your screws through the holes – using your hands at first to tighten in place, and then use a screwdriver to tighten all the way and fix the handle on firmly.
How to fit single hole fix handles
New Handle
Required: Pencil, Drill & Suitable Drill Bit
- Decide roughly the desired position of the handle, and then hold the new handle on the surface in place of the exact location, use a pencil to mark the entry point of where the screw hole will go
- Using your drill and drill bit, drill through the entry point
- Hold the handle over the newly formed hole and push your screw through the hole – using your hand at first to tighten the handle in place, and then use a screwdriver to tighten all the way and fix the handle on firmly.
Replacing Old / Existing Handles
- Remove the old handle by unscrewing the screw
- Hold the handle over the hole and push your screw through the hole – using your hands at first to tighten in place, and then use a screwdriver to tighten all the way and fix the handle on firmly.
How to fit inset / flush handles
Required: Pencil, Small Wood Chisel, Rubber Mallet (Screwdriver)
- Position the pull and mark the location of the inset handle / pull. (this guide assumes you have a solid core cabinet / door)
- Trace the outline of the pull on to the location.
- Use the chisel to remove the wood from inside the markings – ensure you are careful not to go too deep in the wood.
- Position the new inset handle over the top of the chiselled area to check its the correct shape and depth.
- If its not the correct size continue to chisel a little at a time testing continually until its correct
- Push the inset handle in to the chiselled area and use the rubber mallet to gently tap the handle in.
- Some inset handles have screw holes to hold the handle in to position – of yours has these holes install the screws through the holes and screw in to position with a screwdriver
To view our range of handles click here They can be ordered loose or in trade quantities – next day delivery, no minimum order quantity.